wood frame mounts

ws9876
Solar Expert Posts: 453 ✭✭✭
about the Canadian Solar 310 watt mono panels... do they have threaded holes on the back to run bolts into? what size?
Comments
-
Drilling holes or not--That is usually a warranty issue (if panels are cheap and/or purchased without warranty, then that is not an issue).
Of course, holes can weaken the framework, so be careful of the location and size of holes.
Doing wood frame mounts, if using pressure treated lumber, make sure you purchase hardware that is compatible--Pressure treated lumber is much more conductive (typically some sort of copper solution) and can corrode older/non-pressure treated rated hardware.
-BillNear San Francisco California: 3.5kWatt Grid Tied Solar power system+small backup genset -
Most will have information on the layout/mounting holes on their info sheet. Most will have holes for mounting. I recently picked up some larger panels (Q-cell?) from a utility install and they had mounting holes. Let me see if I can find a ling to your "Canadian Solar 310 watt mono" panels.ws9876 said:about the Canadian Solar 310 watt mono panels... do they have threaded holes on the back to run bolts into? what size?
So here's a link to the info on CanadianSolar 310ms panels
https://www.canadiansolar.com/upload/a8809bc5e67815f0/458cffa3d74f0690.pdf
It includes this engineering drawing;
The hole radius is 4.5mm so diameter is 9mm, should be 5/16ths bolts to install.
You may also find installation instructions from the company. I think this is your install instruction sheet;
https://www.canadiansolar.com/upload/0ea8d0f757e1236f/10b409d715356705.pdf
If not, hunt around on this page for it;
https://www.canadiansolar.com/downloads
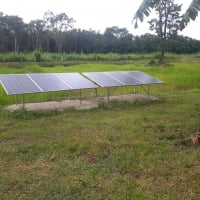
You can make simple mounts from aluminum angle. ad mount to wooden 'joists'. I used 1/8th" aluminum angle and they still look good after 7 years. Wooden frame work has been through 60mph straight line winds and 18" snow load. with no problems yet, knock-on-wood!
If you make a template and drill single mounts for both panels, with the spacing you want between the panels, you will end up with uniform spacing. Much easier than single mounts (which I did a few, my first time in 2004). This is actually a photo when I sold my array from 2004 system, I was worried about the reaction between the aluminum and the pressure treated wood from 2003-4. So I added a spacer. I also did some without the spacer and they were fine in 2012 when I sold the system so I didn't bother with my new system. These were 3/16ths 1.5x 1.5 angle, I used 2x3 1/8th inch on my current array. Much easier to work with.
I used 5/4 decking boards for my 'joists' on my current array. it was a reaction to the poor quality 2x6s that were available. The decking was #1 or prime boards. Only small intact knots. I used sections of 4x4's between cross members of 2x8s (maybe 2x10s) Note I have a very nice wind break behind the array! Might alter my design without it!
The 4x4s are earth contact pressure treated, there are different levels of pressure treating. They are also below the frost line at 4' with concrete at the bottom. It was recommended to me by an engineer not to place them in concrete to ground level. If you do this creates a fulcrum point and pressure point for them to break. Note there are double cross members above and below. This allows for easy installation.
Note only the far right joist is attached at the top. So the spacing is created by the panel mounts no forcing them into compliance. Once done I used a crow bar to pick them about 1/2" off the upper cross members and mount to 4x4 pieces sandwiched between the cross members at the top. This worked surprisingly well.
I had to go to 16' joists as the panels were just taller than 12 feet. I asked my engineer brother what he thought about adding another row of panels, and he said it should be fine, and I have since added 4 more.
Power center and battery are under the edge near the home.
They have handled a 18" snow load, so I think I'm good, though I worry a bit about the top row as they age, this was 6 years in and they did fine.
Hope this helps or gives you ideas!
Home system 4000 watt (Evergreen) array standing, with 2 Midnite Classic Lites, Midnite E-panel, Magnum MS4024, Prosine 1800(now backup) and Exeltech 1100(former backup...lol), 660 ah 24v Forklift battery(now 10 years old). Off grid for 20 years (if I include 8 months on a bicycle).
- Assorted other systems, pieces and to many panels in the closet to not do more projects. -
thanks for infobtw....if you wanted to convert mc4 to straight Romex , is there a cheap fitting for that ..I dont want to cut off the mc4..thanks
-
Romex is a brand, but usually refers to house wiring wire/cable covered in outer plastic. I am not aware of any that is rated for UV exposure/outside use. You will likely want to use a combiner box and can run a single pair of wires to your charge controller. Here's my double combiner box, using fuses instead of breakers;ws9876 said:btw....if you wanted to convert mc4 to straight Romex , is there a cheap fitting for that ..I dont want to cut off the mc4..
From the combiner box to the breaker box I use THHN in conduit.
USE2 and PVwire are rated for outside exposure, If you don't want to buy premade cable, you can make the connections your self. There are reasonably priced good crimpers for MC4. Buy the anvil type for a few dollars more than the hinged type(around $30). USE2 is almost always 7 strand is, and is a pain to crimp, but often cheaper. If you want to use it, I'd suggest stripping the cable as normal then clipping 1 strand, and guide the other strands into either side of the crimp. Like I said an PITA!
Note you only have to do one side of the MC4 as the side coming into the combiner box is going straight into the fuse or breaker. I think I bought 2 - 100 foot MC4 extension cable figuring it would be all the wire I needed. I bought off eBay cheaper than I could find the wire. I checked their connectors and found they had been soldered instead of crimped so I replaced them, soldered connections don't hold up well with vibrations and aren't to code unless they are crimped first.
Where are you located? I would be willing to lend you a MC4 crimper (crappy hinged style paid $70 back in 2004!!!!) and might be able to help with some wire. I pulled a couple systems (at least 1 had the correct wire...lol) and saved the wire and I always seem to have some around, though I'd have to get something for any new wire.
Home system 4000 watt (Evergreen) array standing, with 2 Midnite Classic Lites, Midnite E-panel, Magnum MS4024, Prosine 1800(now backup) and Exeltech 1100(former backup...lol), 660 ah 24v Forklift battery(now 10 years old). Off grid for 20 years (if I include 8 months on a bicycle).
- Assorted other systems, pieces and to many panels in the closet to not do more projects. -
Very nice documentation photowit.
Btw, I am also upgrading, and found these on ebay, ordered a sample and quality is great. Solar Panel Mounting Bracket Photovoltaic Panel End Mid Clamp Kit For Roof( 133282943602 ). I bought them for like $2.08, a month ago, now they are up to $3 something. Hard to buy stainless bolts for that and with clamps you do not care about holes as long as you are in the support zone.Off grid, all solar, passive and active (winter wood heat supplements) PV DHW.
Array 1-- 12 Sunpower 250, Outback FM 100 3kw
Array 2-- 12 Sunpower 250, Outback FM 100 3kw
Well array 780w, 6 Kyocera 130 w with Grundfos sqflex 11 and cu200 to elevated storage, ( 2- 330 g tanks,) no battery storage at well
10 24 volt Battle Born Lithiums
Outback Flexpower Two, VFXR 3524A 7kw
-
If I might add, if you're drilling holes in the panel frames...towards the cells then get a hardwood block that fits between the frame and the back of the cells. That way when the drill bit breaks through the aluminum frame material it won't run into the back of the cell. Don't ask me how I know.
The same block used for the entire job. If you have someone helping who thinks they won't damage a panel...give them one too!
Rlaph -
Happened to you too did it? Drilling through thin material sucks the bit in fast, good advice based on experience.Ralph Day said:If I might add, if you're drilling holes in the panel frames...towards the cells then get a hardwood block that fits between the frame and the back of the cells. That way when the drill bit breaks through the aluminum frame material it won't run into the back of the cell. Don't ask me how I know.
The same block used for the entire job. If you have someone helping who thinks they won't damage a panel...give them one too!
Rlaph1500W, 6× Schutten 250W Poly panels , Schneider MPPT 60 150 CC, Schneider SW 2524 inverter, 400Ah LFP 24V nominal battery with Battery Bodyguard BMS
Second system 1890W 3 × 300W No name brand poly, 3×330 Sunsolar Poly panels, Morningstar TS 60 PWM controller, no name 2000W inverter 400Ah LFP 24V nominal battery with Daly BMS, used for water pumping and day time air conditioning.
5Kw Yanmar clone single cylinder air cooled diesel generator for rare emergency charging and welding.


Categories
- All Categories
- 233 Forum & Website
- 140 Solar Forum News and Announcements
- 1.3K Solar News, Reviews, & Product Announcements
- 181 Solar Information links & sources, event announcements
- 896 Solar Product Reviews & Opinions
- 252 Solar Skeptics, Hype, & Scams Corner
- 22.5K Solar Electric Power, Wind Power & Balance of System
- 3.5K General Solar Power Topics
- 6.7K Solar Beginners Corner
- 1K PV Installers Forum - NEC, Wiring, Installation
- 2.1K Advanced Solar Electric Technical Forum
- 5.6K Off Grid Solar & Battery Systems
- 428 Caravan, Recreational Vehicle, and Marine Power Systems
- 1.1K Grid Tie and Grid Interactive Systems
- 656 Solar Water Pumping
- 816 Wind Power Generation
- 621 Energy Use & Conservation
- 623 Discussion Forums/Café
- 316 In the Weeds--Member's Choice
- 74 Construction
- 125 New Battery Technologies
- 108 Old Battery Tech Discussions
- 3.8K Solar News - Automatic Feed
- 3.8K Solar Energy News RSS Feed