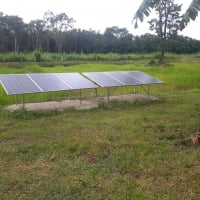
Does this look strong enough and I'm not sure on the angle. I attached my video. Thanks!

solarhungry
Registered Users Posts: 29 ✭✭
 https://youtu.be/QrsVuuW_Cjs
Comments
-
If you're going to have high voltage electric near playground you need to at least fence the electric area kids are curious.
-
Where the heck are you? 80 degrees for a fixed (It's now a fixed array) you would need to be around the artic circle! And summer angles would be shallower... You want the sun to come into the array at a right angle. The shadow looks like it's under the play set, though on an overcast day this might be misleading. Generally you want to have an angle within 10-15 degrees of you latitude, so if you live in in Pittsburg USA at @40 degrees latitude, your angle should be between 30 and 50 degrees. Most will choose a slightly greater angle (closer to the 50 degrees) to help compensate for shorter days in the winter.
I don't know metal, but I would be uncomfortable with the framing/lack of a large base. Lots of torque with a big sail like that array. I does appear you have wind breaks in front and behind your array, it might be fine, but suspect you will want to change the angle depending on your latitude.
On mounting panels, they provide holes for mounting, no reason to reinvent the wheel if you have access to the from behind. Most manufactures also provide mounting instruction, some larger panels they would like to see a 6 point mount in high wind areas.
Home system 4000 watt (Evergreen) array standing, with 2 Midnite Classic Lites, Midnite E-panel, Magnum MS4024, Prosine 1800(now backup) and Exeltech 1100(former backup...lol), 660 ah 24v Forklift battery(now 10 years old). Off grid for 20 years (if I include 8 months on a bicycle).
- Assorted other systems, pieces and to many panels in the closet to not do more projects. -
80 degrees from VERTICAL not HORIZONTAL. They should be almost flat for summer.solarhungry said:
That's a lot of sail on a small foundation. Are you confident they will survive a 60mph wind?
-
In winter, if you need that angle, the trees would block the sun anyway.Off-grid.
Main system ~4kw panels into 2xMNClassic150 370ah 48v bank 2xOutback 3548 inverter 120v + 240v autotransformer
Night system ~1kw panels into 1xMNClassic150 700ah 12v bank morningstar 300w inverter -
There is no triangulation, that is the reason for the flex, incredible rigidity can be achieved using small material, if triangula space frame techniques are employed.
https://en.m.wikipedia.org/wiki/Space_frame
1500W, 6× Schutten 250W Poly panels , Schneider MPPT 60 150 CC, Schneider SW 2524 inverter, 400Ah LFP 24V nominal battery with Battery Bodyguard BMS
Second system 1890W 3 × 300W No name brand poly, 3×330 Sunsolar Poly panels, Morningstar TS 60 PWM controller, no name 2000W inverter 400Ah LFP 24V nominal battery with Daly BMS, used for water pumping and day time air conditioning.
5Kw Yanmar clone single cylinder air cooled diesel generator for rare emergency charging and welding. -
If you are going to go for triangles in your structure , you should look at it in 3 dimensions of the frame
KID #51B 4s 140W to 24V 900Ah C&D AGM
CL#29032 FW 2126/ 2073/ 2133 175A E-Panel WBjr, 3 x 4s 140W to 24V 900Ah C&D AGM
Cotek ST1500W 24V Inverter,OmniCharge 3024,
2 x Cisco WRT54GL i/c DD-WRT Rtr & Bridge,
Eu3/2/1000i Gens, 1680W & E-Panel/WBjr to come, CL #647 asleep
West Chilcotin, BC, Canada -
Are the PV Frames made of aluminum?
Are the uni-struts made of steel?
Do you need something between them to prevent corrosion?
Did you use Stainless Nuts, Bolts & Washers?
Is every metal part "electrically bonded" to every other part for Grounding purposes?
ANGLE = At Solar Noon, the panels should be perpendicular to the sun
Since you have two poles then 8 panels / 2 poles = 4 panels per pole (approx?)
A 4" diameter Sched 40 steel pole needs to be buried 4' deep & surrounded by a 16" diameter concrete & rebar pier.
1/3 of the pole (minimum) needs to be buried, while 2/3 of the pole (maximum) is allowed to be above ground.
In 50 mph winds, each pole must resist 400 lbs of force from the panels.
Can each of your support poles resist 400 lbs of pulling or pushing force?
-
Lumisol said:If you're going to have high voltage electric near playground you need to at least fence the electric area kids are curious.
-
I agree,good thoughts. The swing set is going to be dismantled this weekend but I will still take that into consideration and fence up that area with the extra fencing I have laying around.
-
Photowhit said:Where the heck are you? 80 degrees for a fixed (It's now a fixed array) you would need to be around the artic circle! And summer angles would be shallower... You want the sun to come into the array at a right angle. The shadow looks like it's under the play set, though on an overcast day this might be misleading. Generally you want to have an angle within 10-15 degrees of you latitude, so if you live in in Pittsburg USA at @40 degrees latitude, your angle should be between 30 and 50 degrees. Most will choose a slightly greater angle (closer to the 50 degrees) to help compensate for shorter days in the winter.
I don't know metal, but I would be uncomfortable with the framing/lack of a large base. Lots of torque with a big sail like that array. I does appear you have wind breaks in front and behind your array, it might be fine, but suspect you will want to change the angle depending on your latitude.
On mounting panels, they provide holes for mounting, no reason to reinvent the wheel if you have access to the from behind. Most manufactures also provide mounting instruction, some larger panels they would like to see a 6 point mount in high wind areas.Photowhit said:Where the heck are you? 80 degrees for a fixed (It's now a fixed array) you would need to be around the artic circle! And summer angles would be shallower... You want the sun to come into the array at a right angle. The shadow looks like it's under the play set, though on an overcast day this might be misleading. Generally you want to have an angle within 10-15 degrees of you latitude, so if you live in in Pittsburg USA at @40 degrees latitude, your angle should be between 30 and 50 degrees. Most will choose a slightly greater angle (closer to the 50 degrees) to help compensate for shorter days in the winter.
I don't know metal, but I would be uncomfortable with the framing/lack of a large base. Lots of torque with a big sail like that array. I does appear you have wind breaks in front and behind your array, it might be fine, but suspect you will want to change the angle depending on your latitude.
On mounting panels, they provide holes for mounting, no reason to reinvent the wheel if you have access to the from behind. Most manufactures also provide mounting instruction, some larger panels they would like to see a 6 point mount in high wind areas.
-
The array is adjustable. I was using an Angle Phone App If I was reading it right it was showing 70 degree on my phone. The solar frame wouldn't adjust to 80 degree. On the video @8:01 it showed the Solar Calculator I was using. For Fort Worth TX in Summer setting they are showing 80 degree but in the picture latitude the 80 degree is more level towards the sky. I guess I need to not use my phone app and go by the picture of the solar calculator. Plus that will bring the array lower and not acting as such a big wind sail. If anything I suppose I could take off the 2 top panels. I will reset the angle of the solar frame and see how sturdy it feels. The panels are set in the South. These panels didn't have any predrilled holes in the frames.
-
mvas said:Are the PV Frames made of aluminum?
Are the uni-struts made of steel?
Do you need something between them to prevent corrosion?
Did you use Stainless Nuts, Bolts & Washers?
Is every metal part "electrically bonded" to every other part for Grounding purposes?
ANGLE = At Solar Noon, the panels should be perpendicular to the sun
Since you have two poles then 8 panels / 2 poles = 4 panels per pole (approx?)
A 4" diameter Sched 40 steel pole needs to be buried 4' deep & surrounded by a 16" diameter concrete & rebar pier.
1/3 of the pole (minimum) needs to be buried, while 2/3 of the pole (maximum) is allowed to be above ground.
In 50 mph winds, each pole must resist 400 lbs of force from the panels.
Can each of your support poles resist 400 lbs of pulling or pushing force?
-
The solar frames are Aluminum. Everything else steel. Nuts bolts are zinc coated. I will still have to ground the panels as the solar frames seem to have a coating on them. Unless I ground the coating off some but at this point going to be easier just to add some copper ground wire with self tapping screws. I the post should be able to with stand 400 lbs. Thinking with the cement filled and more than 1 post per side to hopefully make up for the larger post I should have just gone out and bought in the beginning.
-
Estragon said:In winter, if you need that angle, the trees would block the sun anyway.
-
With thew help of everyone's input the angle of the array is off so I will adjust to correct it. I don't recall in the winter of the sun in this area but right now in late Spring the tree's shadows are not close to the panels and are getting good sun. The trees aren't fully matured yet too.
-
I'd also argue the app is junk, Looks like it's saying to use the peak summer and winter rather than a best average. If it was an app for solar it would also have times of adjustments, other wise you would adjust at the season so @Dec 22 for winter for Jan Feb and most of March, all of which have better angles all in the same side of 34 degrees...

Home system 4000 watt (Evergreen) array standing, with 2 Midnite Classic Lites, Midnite E-panel, Magnum MS4024, Prosine 1800(now backup) and Exeltech 1100(former backup...lol), 660 ah 24v Forklift battery(now 10 years old). Off grid for 20 years (if I include 8 months on a bicycle).
- Assorted other systems, pieces and to many panels in the closet to not do more projects. -
Here is the frame I built using triangulation, very ridged despite small dimension steel
 1500W, 6× Schutten 250W Poly panels , Schneider MPPT 60 150 CC, Schneider SW 2524 inverter, 400Ah LFP 24V nominal battery with Battery Bodyguard BMS
Second system 1890W 3 × 300W No name brand poly, 3×330 Sunsolar Poly panels, Morningstar TS 60 PWM controller, no name 2000W inverter 400Ah LFP 24V nominal battery with Daly BMS, used for water pumping and day time air conditioning.
5Kw Yanmar clone single cylinder air cooled diesel generator for rare emergency charging and welding. -
a) "ZInc Coated", is not the same thing as Stainless Steel.solarhungry said:The solar frames are Aluminum. Everything else steel. Nuts bolts are zinc coated(a). I will still have to ground the panels as the solar frames seem to have a coating on them. Unless I ground the coating off some but at this point going to be easier just to add some copper ground wire with self tapping screws(b). The post should be able to with stand 400 lbs(c). Thinking with the cement filled and more than 1 post per side to hopefully make up for the larger post I should have just gone out and bought in the beginning.
b) "Self Tapping Screws" is not CODE.
c) "should be able to with stand 400 lbs", An Architect or Engineer is going to disagree with you. You need to bury two @ 4" Sched 40 steel pipe 4' deep and surround them with 16" diameter of concrete with rebar. You should have done significantly more research before digging the first hole. You need to know if your project is safe or not. And don't forget, 50 MPH winds will create 400 lbs of force at each pole, but 100 MPH winds will create 1,600 lbs force at each pole. Your structure needs to be over-engineered. Are there zoning laws and/or required permits where you live? Do need to have this approved by your building and/or electrical inspector?
-
I've made that mistake before. I'd replace them soon before they become so rusted they are locked in place.solarhungry said:The solar frames are Aluminum. Everything else steel. Nuts bolts are zinc coated.
-
It is part of doing a ground correctly though. Exterior rated lugs attached with self tapping SS screws with, ss lock tooth washers... Surface area should be scuffed and dielectric grease applied just after to minimize oxidation.
There are some other options now, WEEB and an all in one ground lug with a screw back that is just screwed in.... I suspect both use a self tapping screw.
Home system 4000 watt (Evergreen) array standing, with 2 Midnite Classic Lites, Midnite E-panel, Magnum MS4024, Prosine 1800(now backup) and Exeltech 1100(former backup...lol), 660 ah 24v Forklift battery(now 10 years old). Off grid for 20 years (if I include 8 months on a bicycle).
- Assorted other systems, pieces and to many panels in the closet to not do more projects. -
Nope, Self-Tapping Screws have not been allowed since NEC 2008.
Must be:
a) A Thread-Forming Machine Screw, with at least 2 very fine machine threads in the frame.
b) A Machine Screw and Nut
Both of the above have machine threads, which are re-usable.
Sorry, but Self-Tapping Screws do not have machine threads, therefore NEC does not consider them "re-usable" = fail inspection.
-
Thread-Forming is just another word for self tapping, they are just defining finer threads.Home system 4000 watt (Evergreen) array standing, with 2 Midnite Classic Lites, Midnite E-panel, Magnum MS4024, Prosine 1800(now backup) and Exeltech 1100(former backup...lol), 660 ah 24v Forklift battery(now 10 years old). Off grid for 20 years (if I include 8 months on a bicycle).
- Assorted other systems, pieces and to many panels in the closet to not do more projects. -
A Thread-Forming Machine Screw is different than a Self-Tapping Screw.
A Thread-Forming Machine Screw is much like a "Tap" in a Tap & Die set.
It cuts a perfect Machine Thread into the metal.
A Thread-Forming Machine Screw can be screwed into and out-of those mating threads, over and over.
It works just like a Nut and a Bolt, it is re-usable and therefore approved by NEC.
A Self-Tapping Screw is more like a wood screw, typically cutting a new set of grooves each time.
After repeated disassembly, the hole will be too large and the Self-Tapping Screw will fall out.
A Self-Tapping Screw is not allowed by NEC = Failed inspection.
NEC is not "just defining finer threads" - NEC did not define any TPI.
Thread-Forming Machine Screws can be fine threads or coarse threads.
NEC requires a minimum of two threads in the metal for strength and Machine Threads for re-use.
The thickness of the PV metal will determine the TPI, that you need to use.
The type of threads found on Wood Screws and Sheet Metal Screws are not Machine Threads.
Re-use makes Thread-Forming Machine Screws far superior to Self-Taping Screws. -
I called the city when I was thinking about putting panels on the roof but decided not. To my surprise the city didn't require permit for solar. I lowered the frame angle to 45 degree today based on my latitude.Not as much as a sail. Also added more support. It feels pretty good. I'm debating on removing the top 2 panels even though things feel pretty solid. I am in thoughts of the unistrut being made for the main 10' x 10' square frame of the array. Unistrut doesn't have the strength as the other steel I am using. While adding more support today I was able to put 1x1 square tubing inside unistrut. I'm going to look to see if that would be an option to add the 1x1 square tubing to the main frame.mvas said:
a) "ZInc Coated", is not the same thing as Stainless Steel.solarhungry said:The solar frames are Aluminum. Everything else steel. Nuts bolts are zinc coated(a). I will still have to ground the panels as the solar frames seem to have a coating on them. Unless I ground the coating off some but at this point going to be easier just to add some copper ground wire with self tapping screws(b). The post should be able to with stand 400 lbs(c). Thinking with the cement filled and more than 1 post per side to hopefully make up for the larger post I should have just gone out and bought in the beginning.
b) "Self Tapping Screws" is not CODE.
c) "should be able to with stand 400 lbs", An Architect or Engineer is going to disagree with you. You need to bury two @ 4" Sched 40 steel pipe 4' deep and surround them with 16" diameter of concrete with rebar. You should have done significantly more research before digging the first hole. You need to know if your project is safe or not. And don't forget, 50 MPH winds will create 400 lbs of force at each pole, but 100 MPH winds will create 1,600 lbs force at each pole. Your structure needs to be over-engineered. Are there zoning laws and/or required permits where you live? Do need to have this approved by your building and/or electrical inspector? -
Thanks for everyone's input. It's been a great help.
-
I think you have missed the NEC's point entirely. The idea is to never disassemble the screw. You should apply dielectric grease to the screw before cutting and it should not be backed out ever. The cutting will ensure a good connection, if ever removed the exposed aluminum oxidizes very quickly. If removed you should likely drill another hole and re tap.
The define a fine thread when they say 2 threads in the metal, doubt there is a frame made that wouldn't require machine screws.Home system 4000 watt (Evergreen) array standing, with 2 Midnite Classic Lites, Midnite E-panel, Magnum MS4024, Prosine 1800(now backup) and Exeltech 1100(former backup...lol), 660 ah 24v Forklift battery(now 10 years old). Off grid for 20 years (if I include 8 months on a bicycle).
- Assorted other systems, pieces and to many panels in the closet to not do more projects. -
The funny thing is no screw ever made has two threads, (the lone exception being a high low type) there is just one that wraps around the cylinder. It's a helix around a cylinder.
How many grooves are in a 45 rpm record? -
Nope, I did not miss the NEC's point entirely.Photowhit said:I think you have missed the NEC's point entirely. The idea is to never disassemble the screw. You should apply dielectric grease to the screw before cutting and it should not be backed out ever. The cutting will ensure a good connection, if ever removed the exposed aluminum oxidizes very quickly. If removed you should likely drill another hole and re tap.
The define a fine thread when they say 2 threads in the metal, doubt there is a frame made that wouldn't require machine screws.
I understand it perfectly.
These screws are not allowed as Ground Screws because they are not Machine Threads:
a) Wood Screws
b) Sheet Metal Screws
c) Self-Tapping Screws
d) Dry Wall Screws
e) Deck Screws
These two screws are allowed per NEC:
a) Thread-Forming Machine Screw
b) Machine Screw
You need to look up the definition of "Machine Threads", as this is your source of confusion
If you need to service the PV Panel, Enphase, Shingles, etc, you need to disconnect and reconnect the Ground Lug.
Only Machine Threads are re-usable.
Self-Tapping Screws do not make Machine Threads, they are not re-usable per NEC and they will fail inspection.
No, you cannot drill another Ground Hole per NEC, you must use the Ground Hole provide by the Manufacturer.
You simply do not understand the NEC Rules.
-
If the metal is 1/16" thick and if you "tap" with 32 TPILumisol said:The funny thing is no screw ever made has two threads, (the lone exception being a high low type) there is just one that wraps around the cylinder. It's a helix around a cylinder.
How many grooves are in a 45 rpm record?
then per NEC you have created "2 threads" inside the pilot hole in the metal.
2 full revolutions = two threads.
2 Threads is the minimum.
That is how NEC "count threads".
Look-up the definition of TPI = Threads Per Inch
It will show you how to count the number threads per inch. -
Why would I look up a term I use all the time and know exactly what it means? That would be a waste of time.
The fact that the term is "threads per inch" does not negate the fact that there is only a single thread wrapped around the cylinder though. The term is simply technically incorrect. It should be "wraps per inch" to be accurate.
That is the point I was making and it is still true. If you are unsure, spin the screw in a drill and watch as the wrap makes it's way up or down the cylinder depending on the rotation.


Categories
- All Categories
- 229 Forum & Website
- 136 Solar Forum News and Announcements
- 1.3K Solar News, Reviews, & Product Announcements
- 179 Solar Information links & sources, event announcements
- 892 Solar Product Reviews & Opinions
- 252 Solar Skeptics, Hype, & Scams Corner
- 22.5K Solar Electric Power, Wind Power & Balance of System
- 3.5K General Solar Power Topics
- 6.7K Solar Beginners Corner
- 1K PV Installers Forum - NEC, Wiring, Installation
- 2.1K Advanced Solar Electric Technical Forum
- 5.6K Off Grid Solar & Battery Systems
- 428 Caravan, Recreational Vehicle, and Marine Power Systems
- 1.1K Grid Tie and Grid Interactive Systems
- 655 Solar Water Pumping
- 816 Wind Power Generation
- 620 Energy Use & Conservation
- 622 Discussion Forums/Café
- 316 In the Weeds--Member's Choice
- 74 Construction
- 125 New Battery Technologies
- 107 Old Battery Tech Discussions
- 3.8K Solar News - Automatic Feed
- 3.8K Solar Energy News RSS Feed