Huge thanks to this forum once again , My 2nd home installation is complete

Nila
Solar Expert Posts: 173 ✭✭
Hi All.,
When I came to this forum for help 4 years ago with very basic knowledge after ordering the Panels , bill (@BB) and many others helped me over the years to learn a lot.
First system was on my old house which was a PWM 48v, 2000KW sort of off-grid but failed due to my laziness and non monitoring and some basic flaws in the system design most of which is because I bought most of the stuff before coming here or seek any expert advice.
This year I said to myself I will listen to the guys here as much as possible and do it better than last time. I only use a fraction of what the equipment is designed to handle .i.e battery /inverter wont be used for more than 30-40% at max.
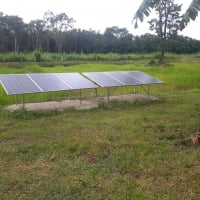
This time i went with a hybrid grid exporting setup 2250 watt panels, 150 AH Battery x 4 , a Chinese inverter which is sold by Indian company with support ( FlinEnergy ) 4KW, it has a MPPT charge controller built in .
I started using this almost 2months ago but could not export to grid due to various issues , I fixed grounding then I asked the grid company to fix the voltage (which was over 256 and my inverter wont export in that case due to regulations) and finally I seem to be exporting around 6-7KWH per day apart from what I use in day time which is minimal.
I waited for the exports to happen before I come back and post the setup pictures.
At peak sun I see about 2.1 KW generated and in cloudy times about 1KW.
Please comment if you notice any issues on my setup ")
I do have some serious grounding questions but I will make a new thread about that.
Thank you all again (more so for BB the man) , Hopefully this time I monitor and keep this running for a long long time. If there is a checklist to monitor monthly or weekly please do so I can have someone go through it without fail!.
Surge Protector on the AC side


Comments
-
Welcome back Nila!
Some observations. I do not know how much wind your home will see--I do not see any "cross pieces" in the design ("triangle" bracing). In general, rectangles can "rack" (twist/collapse) if subjected to enough force. placing triangular bracing will make the mounting much more ridgded and stable. In the current design, the solar panels themselves are providing "shear resistance" or keeping the top mounts from racking. Your vertical legs--The short ones are getting their resistance to bending from the roof structure--But you have some pretty long legs that do not have much bending resistance.
Try to "dress" the cables to the legs/framework. It makes it look nicer and helps keep it from becoming pathways for chewing animals (rodents, etc.).
Are the cables and clear plastic cover(s) Ultra Violet (sunlight) resistant insulation? If not, the sunlight can within a few years make the insulation hard and brittle. Using conduit rated for outdoor exposure will protect the wiring. If you have lightning strikes in the area--Metal conduit will help with lightning control (help keep the lightning energy from your wiring).
And along those lines, the white plastic tie-wraps when used outside will only last a year in sun before they fall apart. Using UV resistant ties, or metal ties, will withstand the sunlight. Use more tie-wraps (or conduit) to keep the cable +/- pairs together. Cables that "have loops" in them (do not run parallel) can pickup nearby lightning energy (radio waves), and also act like a "better" antenna and can make for (typically) AM radio interference.
For the batteries--Tie-wrap the cable from charge controller to near the battery bank (again, prevent loops, lower inductance by paralleling cables, less radio interference). And get a roll of black and a role of red tape--Mark your wiring polarity (particularly the battery cables). When servicing the battery bank, you do not want to connect the cables in reverse (or servicing solar panels, etc.).
Regarding the batteries. Are those water level "floats/indicators"? That would be very neat!
-Bill
Near San Francisco California: 3.5kWatt Grid Tied Solar power system+small backup genset -
Hard to tell from the pic, but the cable for battery interconnects and to inverter look pretty light to me.Off-grid.
Main system ~4kw panels into 2xMNClassic150 370ah 48v bank 2xOutback 3548 inverter 120v + 240v autotransformer
Night system ~1kw panels into 1xMNClassic150 700ah 12v bank morningstar 300w inverter -
That's what I came here to post. That looks to be the metric equivalent of 8 gauge wire. While 8 gauge wire is rated for up to 40 amps, he's going to be losing a considerable amount of power, just heating those wires every time the batteries get charged, or he uses the inverter. He should have 4 gauge, or 21.1mm², wiring between his batteries, and 2 gauge, or 33.6 mm², wiring to his charger. He would save an awful lot of power by not using that 8 gauge, or 8.36 mm² wiring.Estragon said:Hard to tell from the pic, but the cable for battery interconnects and to inverter look pretty light to me.
edit: Even just changing to 6 gauge, or 13.3 mm², wire between the batteries, and 4 gauge, or 21.1mm ², wiring to the charger would make quite a bit of a positive difference in efficiency.
DoD= depth of discharge= amount removed from that battery SoC= state of charge= amount remaining in that batterySo, 0% DoD= 100% SoC, 25% DoD= 75% SoC, 50% DoD= 50% SoC, 75% DoD= 25% SoC, 100% DoD= 0% SoCA/C= air conditioning AC= alternating current (what comes from the outlets in your home) DC= direct current (what batteries & solar panels use) -
BB. said:Welcome back Nila!
Some observations. I do not know how much wind your home will see--I do not see any "cross pieces" in the design ("triangle" bracing). In general, rectangles can "rack" (twist/collapse) if subjected to enough force. placing triangular bracing will make the mounting much more ridgded and stable. In the current design, the solar panels themselves are providing "shear resistance" or keeping the top mounts from racking. Your vertical legs--The short ones are getting their resistance to bending from the roof structure--But you have some pretty long legs that do not have much bending resistance.HI BB,We are not a windy location so no storms like NYC/Toronto , there is a wind season but it is very lite and it is very very rare we see any strong wind here. We have just passed one rainy/windy season in last few months and looks good so far.I will ask my structure guy/company to see if they can help improve the design further based on your notes here.I am really concerned about the panels falling to the ground so I will make sure this is done very soon.
Thank you for these ideas here,Try to "dress" the cables to the legs/framework. It makes it look nicer and helps keep it from becoming pathways for chewing animals (rodents, etc.).
Are the cables and clear plastic cover(s) Ultra Violet (sunlight) resistant insulation? If not, the sunlight can within a few years make the insulation hard and brittle. Using conduit rated for outdoor exposure will protect the wiring. If you have lightning strikes in the area--Metal conduit will help with lightning control (help keep the lightning energy from your wiring).
And along those lines, the white plastic tie-wraps when used outside will only last a year in sun before they fall apart. Using UV resistant ties, or metal ties, will withstand the sunlight. Use more tie-wraps (or conduit) to keep the cable +/- pairs together. Cables that "have loops" in them (do not run parallel) can pickup nearby lightning energy (radio waves), and also act like a "better" antenna and can make for (typically) AM radio interference.I will ask my solar engineer to use conduit/some cover to protect the wires and also will replace the plastic ties with UV resistant ties as soon as I can purchase them here.Not sure I care about interference as this is actually a small roof on top of the inverter/battery room which is located near the stairs on my actual house roof.We only use FM and WIFI/BT but not on the roof anyways.Wires & the Combiner box are UV resistant ,Lightning again is rare and there is a mobile tower opposite of our home ( within 60 feet) and it has a lightning protection so will that help in case of lightning or it is important to have a lightning rod/etc ?
For the batteries--Tie-wrap the cable from charge controller to near the battery bank (again, prevent loops, lower inductance by paralleling cables, less radio interference). And get a roll of black and a role of red tape--Mark your wiring polarity (particularly the battery cables). When servicing the battery bank, you do not want to connect the cables in reverse (or servicing solar panels, etc.).
Regarding the batteries. Are those water level "floats/indicators"? That would be very neat!
-BillYes those are float indicators., it comes with batteries here.Usually we use different colored cables but this time went lazy , I will add coloring to indicate polarity .- good catch.
-
@myocardia
As well as potentially being as waste of power, I would also be concerned about voltage drop between the batteries and charging source(s). I don't see voltage sense wire (or remote temp sensor). If the drop is large, it could lead to chronic undercharging.Off-grid.
Main system ~4kw panels into 2xMNClassic150 370ah 48v bank 2xOutback 3548 inverter 120v + 240v autotransformer
Night system ~1kw panels into 1xMNClassic150 700ah 12v bank morningstar 300w inverter -
Estragon said:Hard to tell from the pic, but the cable for battery interconnects and to inverter look pretty light to me.My battery is just a cache there and the charging happens very rarely i.e if there is a power failure during night which happens once or twice a month for just 1 hour and my max charging limit is set to total of 30A (10A from utility and 20A from solar).Please note I will not be using anything more than 20 -25 amps.I have only connected about 1.5KW of loads to this inverter out of which only 800watt is what I use.Wire I forgot the sizing I actually used but I usually use 16 mm² for batteries I will find out the exact sizing tomorrow morning.8AWG = 3.26 mm , i am 1000% what I use is much higher because I use 2x 4mm2 for the solar to charge converter & 1x 4mm2 for solar interconnects and these battery wires wires look almost twice as big as them so I must be using 4AWG .myocardia said:
That's what I came here to post. That looks to be the metric equivalent of 8 gauge wire. While 8 gauge wire is rated for up to 40 amps, he's going to be losing a considerable amount of power, just heating those wires every time the batteries get charged, or he uses the inverter. He should have 4 gauge, or 21.1mm², wiring between his batteries, and 2 gauge, or 33.6 mm², wiring to his charger. He would save an awful lot of power by not using that 8 gauge, or 8.36 mm² wiring.Estragon said:Hard to tell from the pic, but the cable for battery interconnects and to inverter look pretty light to me.
edit: Even just changing to 6 gauge, or 13.3 mm², wire between the batteries, and 4 gauge, or 21.1mm ², wiring to the charger would make quite a bit of a positive difference in efficiency.
-
@Nila
Note that 8ga is 3.26mm diameter. It would be quite a bit bigger than 4mm2 (diameter ~2.3mm).Off-grid.
Main system ~4kw panels into 2xMNClassic150 370ah 48v bank 2xOutback 3548 inverter 120v + 240v autotransformer
Night system ~1kw panels into 1xMNClassic150 700ah 12v bank morningstar 300w inverter -
Because AWG refers to the diameter it is common to transpose this to a metric equivalent in milimeters,, but metric wire size uses cross sectional area rather than the diameter or mm^2. A conductor of 3.26 mm diameter would be PI r^2 or 3.142×1.63^2=8.35mm^2 or 8AWG
This link for volt drop a calculator has a chart showing the equivalents
http://www.calculator.net/voltage-drop-calculator.html
1500W, 6× Schutten 250W Poly panels , Schneider MPPT 60 150 CC, Schneider SW 2524 inverter, 400Ah LFP 24V nominal battery with Battery Bodyguard BMS
Second system 1890W 3 × 300W No name brand poly, 3×330 Sunsolar Poly panels, Morningstar TS 60 PWM controller, no name 2000W inverter 400Ah LFP 24V nominal battery with Daly BMS, used for water pumping and day time air conditioning.
5Kw Yanmar clone single cylinder air cooled diesel generator for rare emergency charging and welding. -
@Estragon Haha, you're forgetting that the charge controller doesn't need a separate voltage sense wire, just a remote temp sensor. It only needs the wires that it uses to charge the batteries to know their voltage. But yeah, unless that area is both heated and cooled, which it very well may be, then the batteries will be undercharged all winter long, and overcharged all summer long, without a battery temperature sensor.Estragon said:@myocardia
As well as potentially being as waste of power, I would also be concerned about voltage drop between the batteries and charging source(s). I don't see voltage sense wire (or remote temp sensor). If the drop is large, it could lead to chronic undercharging.Nila said:
@Nila That's great. I guess you didn't realize that those batteries get charged every single day that you have sunshine, and every single ampere that you waste on heating your wires is amperes/watts that you are not able to sell back to your electric supplier. If you will use at least 15-20mm² wires between the batteries, and 30mm² or larger between the charger and the batteries, you will gain both power sold back to the grid, as well as more battery power to use while you aren't connected to the grid. See, every single watt that you use to heat your wiring, is a watt that you are not able to use inside your house, even though you have taken that power out of the batteries. You are seriously losing somewhere in the 30-40% range I would guess, with that 8mm² wiring.
BTW, I'm not sure if you could see it, but every single time in this entire thread that I have typed the letters "mm", they have had a superimposed 2 above them, like so: mm². In case it isn't that way in your native language, that superimposed 2 means "squared".
DoD= depth of discharge= amount removed from that battery SoC= state of charge= amount remaining in that batterySo, 0% DoD= 100% SoC, 25% DoD= 75% SoC, 50% DoD= 50% SoC, 75% DoD= 25% SoC, 100% DoD= 0% SoCA/C= air conditioning AC= alternating current (what comes from the outlets in your home) DC= direct current (what batteries & solar panels use) -
@myocardia
Without a voltage sense wire, the CC only sees the voltage on its end of the charging wire. With high current relative to wire size, the voltage on the battery side could be materially lower. If the controller holds an absorb voltage of (eg) 59v, but the actual voltage at the battery end is (eg) 57v because of the voltage drop, the battery could end up deficit charged. If there's only charging (no loads) going on, this would be mitigated somewhat, because as the current required to hold 57v battery side voltage drops off, the voltage drop from wire loss would decrease. With a long enough absorb, the voltage would eventually converge, but more likely the cycle times out or the sun goes down before then.
Some (most?) CCs have a setting to adjust for voltage drop which, absent a sense wire, can compensate for the drop. Of course, you need to measure the actual drop to set a reasonable value. I was going to suggest @Nila do this, but he plans to replace wire.
In my system, I have a shunt and WBjr measuring voltage and current to/from battery buss, and adjust the CCs for the small voltage drop from buss to batteries (0.1v IIRC, which is probably about as accurate as I can expect my cheap MM to be).Off-grid.
Main system ~4kw panels into 2xMNClassic150 370ah 48v bank 2xOutback 3548 inverter 120v + 240v autotransformer
Night system ~1kw panels into 1xMNClassic150 700ah 12v bank morningstar 300w inverter -
Estragon said:@myocardia
Without a voltage sense wire, the CC only sees the voltage on its end of the charging wire. With high current relative to wire size, the voltage on the battery side could be materially lower. If the controller holds an absorb voltage of (eg) 59v, but the actual voltage at the battery end is (eg) 57v because of the voltage drop, the battery could end up deficit charged. If there's only charging (no loads) going on, this would be mitigated somewhat, because as the current required to hold 57v battery side voltage drops off, the voltage drop from wire loss would decrease. With a long enough absorb, the voltage would eventually converge, but more likely the cycle times out or the sun goes down before then.
Some (most?) CCs have a setting to adjust for voltage drop which, absent a sense wire, can compensate for the drop. Of course, you need to measure the actual drop to set a reasonable value. I was going to suggest @Nila do this, but he plans to replace wire.
In my system, I have a shunt and WBjr measuring voltage and current to/from battery buss, and adjust the CCs for the small voltage drop from buss to batteries (0.1v IIRC, which is probably about as accurate as I can expect my cheap MM to be).@Estragon Ahh, very good point! I was thinking of it from the point of view of having used correctly-sized wires in the first place. When the wiring is grossly undersized, you are correct, the CC will be sending and sensing won't be the same, but since the CC isn't smart enough to continue raising the voltage until the battery voltage is high enough, it just never gets them charged completely. Thanks for pointing (and typing) that out.
DoD= depth of discharge= amount removed from that battery SoC= state of charge= amount remaining in that batterySo, 0% DoD= 100% SoC, 25% DoD= 75% SoC, 50% DoD= 50% SoC, 75% DoD= 25% SoC, 100% DoD= 0% SoCA/C= air conditioning AC= alternating current (what comes from the outlets in your home) DC= direct current (what batteries & solar panels use)


Categories
- All Categories
- 229 Forum & Website
- 136 Solar Forum News and Announcements
- 1.3K Solar News, Reviews, & Product Announcements
- 179 Solar Information links & sources, event announcements
- 892 Solar Product Reviews & Opinions
- 252 Solar Skeptics, Hype, & Scams Corner
- 22.5K Solar Electric Power, Wind Power & Balance of System
- 3.5K General Solar Power Topics
- 6.7K Solar Beginners Corner
- 1K PV Installers Forum - NEC, Wiring, Installation
- 2.1K Advanced Solar Electric Technical Forum
- 5.6K Off Grid Solar & Battery Systems
- 428 Caravan, Recreational Vehicle, and Marine Power Systems
- 1.1K Grid Tie and Grid Interactive Systems
- 655 Solar Water Pumping
- 816 Wind Power Generation
- 620 Energy Use & Conservation
- 622 Discussion Forums/Café
- 316 In the Weeds--Member's Choice
- 74 Construction
- 125 New Battery Technologies
- 107 Old Battery Tech Discussions
- 3.8K Solar News - Automatic Feed
- 3.8K Solar Energy News RSS Feed