Internal wiring of a panel
Joe Bennett
Solar Expert Posts: 57 ✭✭✭✭
Is there such a thing as an internal schematic or pictorial for a solar panel that might be available to the user? I have a Schott ASE-300-DGF/50 panel I would love to rewire to provide more current at less volts if possible. I have opened the connection box on it, and have taken voltage readings between various points on the PC board inside. I can get anywhere from 9+ to almost 60 vdc between ground and those points. It seems that if a new PC board was created, it might be possible to parallel sections of the panel with each other instead of the existing series setup. Attached is a photo of the spec plate on rear of the panel. What I am really interested in would be to set it up for a nominal 12 vdc as I already have a charge controller that I want to use for it. Open to suggestions, and thanks....
Joe
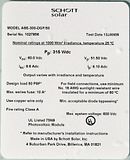
Just click on photo for larger view
Joe

Just click on photo for larger view
Comments
-
Re: Internal wiring of a panel
Joe,
I’ve not seen a schematic per se for any PV module. But, based on typical cell performance, we may be able to infer a particular configuration for your 300 W module.
For example, most of my PV modules are BP (Solarex) SX-60 modules. Each contains 36 cells wired in two series sections of 18 cells each. The junction box allows the two sections to easily be wired in series to make a “12 V” 60 W module (16.8 Vmp x ~3.56 A Imp), or in parallel to make a “6 V” 60 W module (8.4 Vmp x 7.12 A Imp).
The key bit of hopefully useful info is that each cell is good for ~16.8 V / 36 cells = ~0.47 V/cell.
Your 300 W module consists of 216 cells. 108 cells x 0.47 V/cell is 50.76 V, so this suggests to me that the module consists of two series string sections of 108 cells each, and that the two sections are internally wired in parallel.
See: http://www.us.schott.com/photovoltaic/english/download/pd-00-009-c_ase_300.pdf
Schott’s data sheet also indicates that there’s a bypass diode in parallel with every 18 cells. Since 18 x ~0.47 V = 8.46 V, and probably a bit higher when measured “open circuit”, I suspect this is the source of your ~9 V measurement.
So, your module probably consists of 12 sub-sections with 18 modules wired in series in each sub-section, and a bypass diode in parallel with each sub-section. Six sub-sections are probably wired in series to make one 108 cell section as described earlier, and two sections are ultimately connected in parallel.
In fact, I suspect that it you take a look at the “active" side of the module, you’ll find the 216 cells are arrayed in an 18 (long) x 12 (wide) pattern.
The challenge would be to get inside and reconfigure your module from six sub-sections in series (108 cells per section) x 2 sections in parallel (216 cells total) to two sub-sections in series (36 cells) x six new sections in parallel (216 cells total).
If you can do this, you’d end up converting a panel rated at 50.6 Vmp x 5.9 A Imp to ~16.7 V x ~17.7 A. Or, using the specs on the nomenclature plate, converting from 51.5 V x 6.1 A to ~17.17 V x 18.3 A. Either way, this should work for a “12 V" application in all but the hottest environments. 8-)
Now, can you get to all of the conductors inside the module “sandwich”?
HTH,
Jim / crewzer -
Re: Internal wiring of a panel
Thanks for the info Jim. It will be sunday before I can check out the panel, have a 1st birthday party tomorrow for my youngest grandson so gonna be tied up for a bit with that.
I will take some photos of the inside of the connection box, and document the readings as per locations on the board itself when I can get into it sunday. There are 6, 3 pin devices (the diodes most likely) attached to a heatsink inside the box. A schematic would just have been so much easier than tracing it all out across the PC board, but oh well........
Again, thanks for the info..............
Joe -
Re: Internal wiring of a panelcrewzer wrote:If you can do this, you’d end up converting a panel rated at 50.6 Vmp x 5.9 A Imp to ~16.7 V x ~17.7 A. Or, using the specs on the nomenclature plate, converting from 51.5 V x 6.1 A to ~17.17 V x 18.3 A.
How safe is it to assume the internal metal can handle 18A, or is that all paralleled at the J-box ?Powerfab top of pole PV mount | Listeroid 6/1 w/st5 gen head | XW6048 inverter/chgr | Iota 48V/15A charger | Morningstar 60A MPPT | 48V, 800A NiFe Battery (in series)| 15, Evergreen 205w "12V" PV array on pole | Midnight ePanel | Grundfos 10 SO5-9 with 3 wire Franklin Electric motor (1/2hp 240V 1ph ) on a timer for 3 hr noontime run - Runs off PV ||
|| Midnight Classic 200 | 10, Evergreen 200w in a 160VOC array ||
|| VEC1093 12V Charger | Maha C401 aa/aaa Charger | SureSine | Sunsaver MPPT 15A
solar: http://tinyurl.com/LMR-Solar
gen: http://tinyurl.com/LMR-Lister , -
Re: Internal wiring of a panelmike90045 wrote:How safe is it to assume the internal metal can handle 18A, or is that all paralleled at the J-box ?
It all appears to be brought out at the connection box, and then the series hookup is made on the PC board and through the diodes there. Any added size wire that might be needed most likely would be in the wire feeding the charge controller once all the panel sections are paralleled. That would need to be able to handle the added current from that point on. Since the panel current is ~6.5amps, each section would be able to provide that, and in parallel they would all be additive. So, wiring would need to be able to handle about 40 amps or more. Would need to be around #6 AWG to be on the safe side. Darn, I need to get more into this, and definitely get photos of the connection box and PC board...............
Joe -
Re: Internal wiring of a panel
The charge controller I would like to use is by Specialty Concepts Inc., and is their Mark/15-12. I have it on hand now, and am using it on a Pole Camera support cart that provides power to my MastCAM system. I have a smaller solar panel (a ICP Solar 04028 BatterySaver SE6) that I use to keep the system topped off in the field. Battery being charged by it is a Marine Deep Discharge 12vdc lead acid rated at 125ah. More info to come.........
Joe -
Re: Internal wiring of a panel
Joe,
Mike makes a good point, but it sounds like you have it covered.
On a related note, re-wiring of the module may result in 6.6 A Isc x 3 = 19.8 A Isc. Factoring in the NEC's 125% surge requirement for controller's rated to continuously operate at 100% of max current, the design spec is 19.8 A Isc x 125% = 24.75 A. The Mark-15's max Isc spec is 15 A, so it's technically too small for your application, in my view. However, a related spec says it can handle 130% of rated charge current for up to 60 seconds, so that might be long enough to withstand a serious edge-of-cloud event.
See: http://www.specialtyconcepts.com/SPECIALTY_CONCEPTS_PDF_FILES/MARK_15_SPEC_SHEET.PDF
No matter what, I think you'll be pushing the controller's limits.
Regards,
Jim / crewzer -
Re: Internal wiring of a panel
I too agree that the charge controller will be too small to handle the potential current from the panel. A thought that I had was that I might be able to get by for my intended application by bringing out only part of the panel to feed the controller. Or maybe bring the output out in more than one circuit to feed a second or even a third at some future time. I was originally considering the purchase of a larger voltage/amperage charge controller and using the panel as is, but prices seem to be in the two to three hundred range for ones that would handle the panel properly....
Joe -
Re: Internal wiring of a panel...prices seem to be in the two to three hundred range...
Nah... there are several Morningstar and Xantrex PWM controllers for well under $200 that could handle the reconfigured module.
See: http://store.solar-electric.com/mochco.html
and: http://store.solar-electric.com/xachco.html
HTH,
Jim / crewzer
-
Re: Internal wiring of a panel
Group,
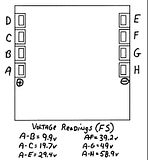
Was finally able to get at the panel again, and took a few photos and readings. Attached is a photo of the inside of the connection box which has the Bypass Diode Assembly board inside. Also a chart of the readings as taken with a DVM in full sun, no load, between various points of the PC Board. Just click on the photos for full size views.
Joe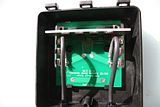 ;
;
-
Re: Internal wiring of a panel
I think that tomorrow (wednesday) I will try to get a few reading under load conditions from the panel. My charge controller can handle the 9v and 18v, but not sure about the next tap up at the 29v area. I do plan on hooking up to the controller to see what the taps will provide to the system battery, but do not want to damage it in the process. So, will proceed with caution, and not exceed its ratings. Will post results when done, and still open to other ideas and comments too about this project.
Joe -
Re: Internal wiring of a panel
I think you'll find that from negative (ground) to any tap will only give you the amps that the panel is rated for, only the voltage will change. However, if you can break into the taps and separate the different strings, so you can re-wire them in parallel, then you can get higher amps output. Unfortunately, you may not be able to access at the junction box, the points where the strings actually connect. These points may be buried in the depths of the panel, with only a single lead brought out to the junction box for the bypass diode, in which case, you're stuck with what you have. -
Re: Internal wiring of a panel
It does look like I can unsolder each of the taps from the board. Of course that would remove the diodes from the circuit. My charge controller does say that it has reverse leakage protection, so it might therefore take over that function when being used. By removing the board from the equation, I might be able to parallel the taps and gain the added current capability. Will have to see what happens I guess....
Joe -
Re: Internal wiring of a panel
:-)Sounds good Joe!!
Yeah, if you are able to parallel the strings, you shouldn't need the diodes any more anyway, assuming one was across each of the strings that will now be parallel.
Hopefully you can solidly secure (mechanically so they can't move) the wires you intend to solder to the ribbons, so they can not pull on or tear off the ribbons. Now wouldn't that be a disaster!
Best of luck - let us know how you make out.
Wayne
PS: Not many people would ever even dream of attempting what you are thinking of. But you know what? It's exactly the kind of thing I would do in a flash. Go for it man.
-
Re: Internal wiring of a panel
What I am thinking is that if my tests work out as far as the various taps, I might be able to fabricate a new PC Board to fit into the connection box. One that would tie the taps together in the manner I find works best for the voltage and current. There is a supply house nearby that does sell blank PC Boards, just have to see if they are thicker copper if possible, and then etch the new pattern needed. Have not done any etching in a few years, but its not too hard to do once the design is done. Might even be able to include the diodes needed too....
Joe -
Re: Internal wiring of a panel
You should be able to simply cut etches with a sharp utility knife to isolate the strings into voltage you want, then parallel all within the same PCB
The diodes on the PCB are for shadow bypass and its a different function than the controllers reverse night time diodes. You must have the diodes on the panel or you can damage the cells with overcurrent of the parallel strings being sunk into the shadowed cell
Keep in mind, you no longer have any warranty by changing the connections in the Jbox -
Re: Internal wiring of a panel
Warranty is really not an issue as the complete panel was written off by the company I obtained it from. The panel was removed from service due to "crazing" of the top glass plate. The panel still produces the same voltage and current, but could not be left in place due to the condition of the glass. The panel was in service for around 1 year prior to being replaced and then "surveyed" and basically was going to be thrown into a dumpster when I was made aware of it. After talking with the company, and receiving permission from their headquarters, they kindly released the panel to me for experimentation. Damaged panels do occasionally turn up, and I have hopes that I may be able to obtain more in the future. Heck, the price was right anyway :-D. One of the things I also hope to do regarding this panel is to try to determine how it was damaged in the first place. There does not appear to be any "impact" spots on the surface, yet the glass is pretty much evenly "crazed". Fortunately though, the plastic imbedded in between the glass and the cells appears to be pretty much intact, and does not appear to have leaked water to the cells.
Thanks for the info about the diodes. I will have to see if I can obtain the part numbers from them and do some research on exactly what they are as far as devices types and specs. As I would need to remove the PC Board to cut any of the traces on it anyway, creating another with traces made specifically would not be that much more work. Incorporating the diodes would not entail much more either, and since it is all for experimental purposes, it will all be a good learning experience....
Joe -
Re: Internal wiring of a panelJoe Bennett wrote:Warranty is really not an issue as the complete panel was written off by the company I obtained it from. The panel was removed from service due to "crazing" of the top glass plate. The panel still produces the same voltage and current, but could not be left in place due to the condition of the glass.
That darn tempered glass, it's tough, but when it cracks, it's not a little crack, it takes out the whole sheet. It's not watertight anymore, and the cells will eventually die from the elements, but have fun playing with it. The dryer you keep it, the longer it will last. Dew & rain will kill it.Powerfab top of pole PV mount | Listeroid 6/1 w/st5 gen head | XW6048 inverter/chgr | Iota 48V/15A charger | Morningstar 60A MPPT | 48V, 800A NiFe Battery (in series)| 15, Evergreen 205w "12V" PV array on pole | Midnight ePanel | Grundfos 10 SO5-9 with 3 wire Franklin Electric motor (1/2hp 240V 1ph ) on a timer for 3 hr noontime run - Runs off PV ||
|| Midnight Classic 200 | 10, Evergreen 200w in a 160VOC array ||
|| VEC1093 12V Charger | Maha C401 aa/aaa Charger | SureSine | Sunsaver MPPT 15A
solar: http://tinyurl.com/LMR-Solar
gen: http://tinyurl.com/LMR-Lister , -
Re: Internal wiring of a panel
When not working with the panel, I have been keeping it upright, and covered by a good tarp. I had thought about spraying a clear covering over it to seal any penetrations that might be in the plastic sheet. Or, maybe covering it with a sheet of plexiglass and sealing around the aluminum frame with RTV to make it all watertight. At this point, only have invested in it the time and gas it took to pick it up from company. Supposed to be one of the best panels out there for commercial use, so should be worth playing with for my piddling uses, and maybe will help someone else too. Anyway, with luck, I can make sure it is sealed one way or another, and not lose too much of its capacity in the mean time too....
Joe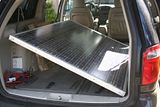
Photo of panel day it was picked up. -
Re: Internal wiring of a panel
I think you will find that that 300 watt panel will probably only do about 100-140 watts with the broken glass. I have a photowatt 165 watt panel thats got the same breakage and the best the panel does now is about 60 watts and its not due to damaged cells.
What happens is all those broken glass fissures cause micro-shadows and reduces the current output. Since its free, have fun and enjoy. Also, there is no need for a new pcb, just unsolder the tabs, make your PCB cuts ( takes less than a minute ) add a few jumpers and your done. If you are going to have the panel outdoors, resin would be a good choice for a sealent, like used for bar table tops, the 2-part stuff
-
Re: Internal wiring of a panel
Here is a photo I took a few minutes ago of the spot on the panel where it seems that the damage occurred. Cracks radiate out from a common central location in the panel, and apparently once they started, most of the pane of glass cracked too. There are still a number of clear and open areas, but overall I would say that about 60% does show cracking over the cells. Surface though is actually smooth, even over the cracks. Anyway, I am wanting to test it under load, but am not sure of what I might use as that load. As the panel is ~60vdc and ~315 watts in rating, what could be used to put it under load for testing? I have a meter that I can hookup to it that will show me volts, amps, and watts all at the same time, and is able to handle the load. Just need to hook something up to the panel to use as that load. Suggestions?
Joe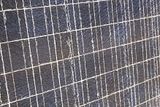
Damage to panel -
Re: Internal wiring of a panel
Those diodes look interesting... it looks like there's six TO-220 packages... two diodes per pak?... 12 diodes to bypass 216 cells... one diode per 18 cells?... sounds kinda "normal"... I suspect the diode packs each contain two diodes wired in true series (the middle connection is for the cathode of one diode and the anode of the other).
HTH,
Jim / crewzer -
Re: Internal wiring of a panel
Solar Panels put out peak power only at one load point, thats called "vmp" ... to match and test the panel you need an electronic load, and I have these for my design work. In your case, I have found a hair-dryer make a good load as the resistance match's 24V panels well, also you can use regular light bulbs but all this would do is tell you what the panel is doing for that load which unlikely would be the vmp point.
I would take out the pcb, make the changes and then you would have a 12 volt panel, then you can use a car battery for a load and get a general idea of what the panels doing. At a battery voltage of ~14-15V, that would give you the current the panel can generate, the vmp would probably be ~ 17volts, but similar current
-
Re: Internal wiring of a panel
Hmmmmmm.....Makes me wonder if I might be able to use a wall heater I have on hand. It is rated at 1500 watts (120 vac). It is one of the ones with the resistive element and is switchable between 1300 and 1500 watts. It does have a fan in it too, but of course that would not work with the DC. Anyhow, maybe if I disconnect the fan I might be able to use the heater as a load to test the panel with. May have to try it unless someone thinks it would be a bad idea here....................
Joe -
Re: Internal wiring of a panel
I might have missed something, but if I understand right, you are thinking of trying a 1500 watt, 120 volt heater (either a hair dryer, or a water heater) to test the solar panel.
If this is so, yes, the element will suck up 1500 watts on 120 volts, but on 12 volts, having a resistance of about 9.6 ohms, it will only draw about 1.25 amps X12 volts = 15 watts, more or less.
You would be better to go with the car battery idea mentioned by Solar Guppy.
Good luck
Wayne -
Re: Internal wiring of a panelJoe Bennett wrote:It does have a fan in it too, but of course that would not work with the DC. Anyhow, maybe if I disconnect the fan
The fan, if you don't disconnect it, will with enough DC, produce smoke.Powerfab top of pole PV mount | Listeroid 6/1 w/st5 gen head | XW6048 inverter/chgr | Iota 48V/15A charger | Morningstar 60A MPPT | 48V, 800A NiFe Battery (in series)| 15, Evergreen 205w "12V" PV array on pole | Midnight ePanel | Grundfos 10 SO5-9 with 3 wire Franklin Electric motor (1/2hp 240V 1ph ) on a timer for 3 hr noontime run - Runs off PV ||
|| Midnight Classic 200 | 10, Evergreen 200w in a 160VOC array ||
|| VEC1093 12V Charger | Maha C401 aa/aaa Charger | SureSine | Sunsaver MPPT 15A
solar: http://tinyurl.com/LMR-Solar
gen: http://tinyurl.com/LMR-Lister , -
Re: Internal wiring of a panel
Unless it's a "universal", brush type motor, as found in many hair dryers, but NOT in regular electric heaters. -
Re: Internal wiring of a panel
The fan is a typical shaded pole A/C motor, and would appear as a direct short to the D/C voltage, so it will have to go for sure. As for the heating coils, I will have to measure them for their resistance and then calculate what the load will be using them. Wayne, the panel unmodified is rated at a Vp of 51.50 Vdc and a Ip of 6.10 Adc. I will measure the resistance of the heater coil after disconnecting the fan from the circuit, and can then calculate the estimated load prior to trying it. I am not too worried about cooling the heater coils as the actual current draw can never exceed what the panel can produce so at a maximum the coils will only have to sink around 300 watts. For taking readings I have a DVM that I will be using for resistance measurements, and then an Astro Model 101 Super Whattmeter which will be used to give me the under test readings. It can handle amps from 10 ma to 70 amps, voltage from 10 mv to 60 volts, power from 1 watt to 4000 watts, and watt hours up to 5000, all in realtime. Only problem is that I cannot record the readings, but hey, for $50.00 it does alot. I use it normally to check specs on the brushless motors I use on my R/C aerial photographic aircraft and it works great....
Joe -
Re: Internal wiring of a panel
Just opened the heater, and found that by removing a single connection it was easy to disconnect the fan. It is a shaded pole motor too. After insulating the fan lead away from everything (used Scotch 33+ tape) I buttoned it back up and took some resistance readings between the line cord connections. When set for 1500 watts, the resistance was 12.4 ohms, and set for 1300 watts it was 10.7 ohms. Does not look like it will fully exercise the panel, but should give me an idea of whether or not it will provide enough output for my experiments. Will post actual readings from it later today if possible. Attached is a photo of the heater to be used....
Joe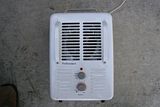
-
Re: Internal wiring of a panel
:-) Looks like your panel is turning out to be a perfect match for a MPPT controller, like the MX 60.
Looking good man!
Wayne
PS: This Solar addiction thing does strange things to people - - I find myself getting all exited about your project - - it's not mine, I don't even know you, never met you and never will! :-D
Fun stuff this Solar.
Cheers. -
Re: Internal wiring of a panel
Group,
Looks like the test rig works pretty good. I even added slightly (.7A) to the overall load by using two 120vac 60w incandescent bulbs too. The meter worked very well, but I think I really need to use a bit heavier test leads so there is less chance of voltage drop. I will rig some up this evening and give it a go again tomorrow. Will have to look in more detail at that MPPT MX60 controller. Would love to put this panel into service, maybe providing some lighting outside at the spa in the evenings. Or even a radio or stereo system and such. Anyone have an MX60 available for trade? I have lots of R/C items including transmitters and receivers, motors, battery packs, and more. Even a 16' tethered blimp and stuff!!! Anyway, more info as I obtain it....
Joe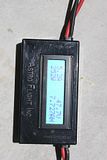
Here is the meter with
panel under test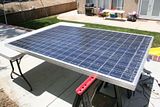
Here is the panel. Sun
directly overhead,
clear sky, no clouds.
Categories
- All Categories
- 234 Forum & Website
- 142 Solar Forum News and Announcements
- 1.4K Solar News, Reviews, & Product Announcements
- 200 Solar Information links & sources, event announcements
- 901 Solar Product Reviews & Opinions
- 256 Solar Skeptics, Hype, & Scams Corner
- 22.5K Solar Electric Power, Wind Power & Balance of System
- 3.5K General Solar Power Topics
- 6.7K Solar Beginners Corner
- 1K PV Installers Forum - NEC, Wiring, Installation
- 2.1K Advanced Solar Electric Technical Forum
- 5.6K Off Grid Solar & Battery Systems
- 430 Caravan, Recreational Vehicle, and Marine Power Systems
- 1.1K Grid Tie and Grid Interactive Systems
- 656 Solar Water Pumping
- 817 Wind Power Generation
- 624 Energy Use & Conservation
- 624 Discussion Forums/Café
- 316 In the Weeds--Member's Choice
- 75 Construction
- 125 New Battery Technologies
- 108 Old Battery Tech Discussions
- 3.8K Solar News - Automatic Feed
- 3.8K Solar Energy News RSS Feed
